


Australians in The Battle of Britain (Part 4)
by Steve Larkins
As mentioned in the previous feature on this subject, Hitler’s direction to the Luftwaffe to change their priority of effort from hitting RAF airfields and aircraft factories in England’s southeast, to bombing London, proved to be a turning point.
The 7th of September is often referred to as the beginning of ‘the Blitz’: sustained bombing of London and other cities, initially aimed at strictly military, industrial and transport targets, only later morphing into a strategy that attempted to break the will of the people.
However, the shift in emphasis gave the hard-pressed 11 Group some respite and brought the Luftwaffe formations within range of 12 Group further north.
The RAF’s pilot numbers were boosted by the bringing forward of Polish and Czech squadrons, and despite bomb damage to some factories, aircraft production for the RAF stepped up to the challenge. Airfields were repaired and the radar network was reinstated.
To German intelligence, it seemed as if the RAF might be on the verge of collapse. The attacks on London, thus far, seemed to confirm the assumption. It appeared to some that the Luftwaffe bomber formations had not encountered the well organised, effective and ferocious defence that had characterised the battles in August 1940.

Fig. 1 Vapour trails criss-cross the sky above London as the Battle reached its climax on 15th September 1940

If the German intelligence was correct, by striking against vital choke points in London that the RAF would be forced to defend, the Luftwaffe had the opportunity to destroy the remaining RAF fighter forces. Not only would the attacks allow for the attainment of air superiority, they would eliminate a vital rail network, destroy shipping and supplies brought in from North America, and affect civilian morale by demonstrating London's vulnerability to offensive air power.
However the Luftwaffe was facing its own challenges, particularly replacing aircrew lost over England or to the waters of the Channel.
On the 14th September, a debate took place in the German Headquarters where the Luftwaffe Chief of Staff sought permission to unleash attacks on residential areas to cause mass panic. Hitler refused, probably not aware of the damage already done.
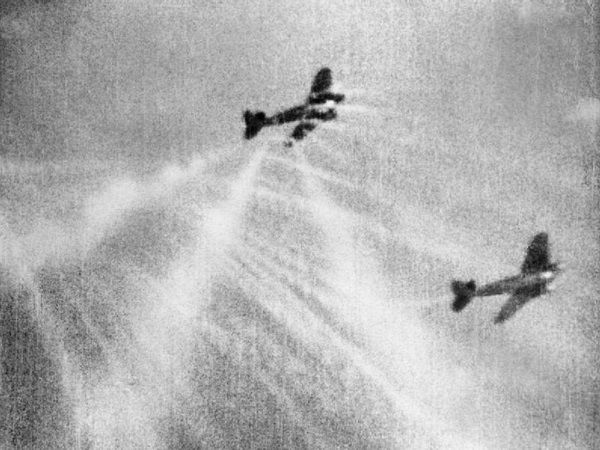
Fig 2. RAF gun camera footage of an attack against two Heinkel He 111 bombers, showing the smoke trails of tracer ammunition

On the 15th September 1940, the Luftwaffe put a very large fleet of two waves of bombers into the effort against London. 11 Group responded with everything they had. The result was decisive. Sixty Luftwaffe aircraft were lost for 26 RAF aircraft down. It was to be the last massed daylight raid and the date is now observed as Battle of Britain Day.
Two days later, Hitler postponed Operation Sealion, the proposed invasion of England. In the face of unsustainable losses in daylight, Luftwaffe raids now transitioned to night raids, to become known as “The Blitz”, against which England’s defences were far less effective. So too, of course, was the accuracy of the raiders.
The period 10th July to 31st October 1940 is now identified as the Battle of Britain. It was in the last phase, from 15th September to the end of October, that the remainder of the Australians lost in the Battle, met their fate.
Sergeant Kenneth Christopher Holland was born in 1920 in Sydney, New South Wales. In the mid-thirties he was living in Camelford, Cornwall in the care of a guardian, a Major Ripley. He was at Airspeed Aeronautical College in 1936-37 and joined the RAFVR in 1939 as an Airman under training Pilot. Called up at the outbreak of war, Holland completed his flying training and joined 152 Squadron at Acklington in June 1940.

Fig 3. Sergeant Ken Holland with the squadron cat

On September 17th Holland shared in the destruction of a Ju88 and on the 19th he shot another down into the sea. On the 25th Holland attacked a He111 and set it on fire. Seeing a parachute, he went in for a closer look but was hit by a gunner still in the stricken Heinkel.
His Spitfire, N3173, crashed near Church Farm, Woolverton. Holland was found to have been shot in the head. The Heinkel crashed at Church Farm. The crew of four were killed, only the pilot baling out and being captured.
John Dallas Crossman was born on 20th March 1919 at Mossman, Queensland, Australia. He was educated at Cook's Hill Primary School and Newcastle Boys' High School in New South Wales. In early 1939 Crossman unsuccessfully applied for a short service commission. A second attempt six months later was accepted and on 12th August 1939 he sailed for Britain.

Fig. 4 Pilot Officer John Dallas Crossman

Crossman arrived at 9 EFTS Ansty on 30th October for his initial training. He moved to 1 FTS at RAF Cranwell on 10th April 1940.
At the end of the course he was posted directly to 32 Squadron at Biggin Hill on 14th July but, the CO sent Crossman to 5 OTU Aston Down on August 3 for conversion to Hawker Hurricanes.
Crossman rejoined 32 Squadron on 26th August. He went north with it to Acklington but on 12th September was posted to No. 46 Squadron at Stapleford Tawney. On the 15th he probably destroyed a Do17 in an engagement south-east of London.
On 30th September 46 Squadron was jumped by Me109's and Crossman was shot down and killed, his Hurricane V6748 crashing in flames at Tablehurst Farm, Forest Row, where he is commemorated.
He is buried in Chalfont St Giles churchyard, Buckinghamshire
Pilot Officer Clarence Bennett was one of three Australians (McDonough and Flood being the others) killed during the Battle, at the controls of a Bristol Blenheim ‘heavy fighter’, in reality an aircraft that would struggle to compete on even terms with the Messerschmitt Bf 109s often ranged against it.
Clarence Charles Bennett was born at Mallala, South Australia on 28th November 1916. He was educated at Kapunda High School and afterwards was employed by the railways as a junior clerk. He was interested in flying and in 1936 joined the Adelaide Gliding Club. He took flying lessons at Mount Gambier in 1937. After applying for a RAF short service commission, Bennett was accepted in December 1938. He sailed for England on 2nd February 1939.

Fig 5. Pilot Officer Clarence Charles Bennett

With flying training completed, he joined 248 Squadron on 6th November 1939, when it was reformed at Hendon operating Blenheims. It was then a fighter squadron but in February 1940 was transferred to Coastal Command. For a period during the Battle of Britain 248 was seconded back to Fighter Command for long-range fighter and reconnaissance duties.
On 28th September Bennett engaged and damaged a Do18 flying boat over the North Sea. His aircraft was hit by return fire and Bennett and his observer, Sgt. GB Brash, were slightly wounded. With fuel tank damaged, Bennett headed rapidly for home. It transpired that the enemy aircraft landed on the sea and was abandoned by its crew before it sank.
Bennett failed to return from a reconnaissance operation to the Norwegian coast on 1st October 1940 in Blenheim R3626. He and his crew, Sergeants Brash and GS Clarke were reported 'Missing'.
All three men are remembered on the Runnymede Memorial, Bennett on Panel 7, Brash and Clarke on Panel 12.
Pilot Officer William Henry Millington was the last Australian and the third South Australian to fall during the Battle.
Born in Newcastle-upon-Tyne on 11th August 1917 Bill as he was universally known, was taken to Australia as a small child. The family settled at Edwardstown, a suburb to the south of Adelaide, South Australia.
He returned to England as a candidate for an RAF short service commission in June 1939. After completing his flying training, Millington arrived at 6 OTU Sutton Bridge on 1st June 1940 and after converting to Hurricanes, he was posted to 79 Squadron at Biggin Hill on the 17th.

Fig 6. Pilot Officer Bill “Terrier” Millington

Millington claimed a Bf109 destroyed on 9th July, three He111's destroyed on 15th August, a He111 destroyed, another probably destroyed and a Bf110 damaged on the 30th and a Do17 and two Bf109's destroyed and another damaged on the 31st.
On this day his Hurricane, P3050, was set alight in combat with Bf109's over Romney. Millington crash-landed on Conghurst Farm, Hawkhurst, wounded in the left thigh and badly burned. He was later admitted to Croydon Hospital.
He could have baled out but chose to steer his aircraft away from a village. He got out just before the petrol tanks exploded.
He was awarded the DFC (gazetted 1st October 1940). He was then posted to No. 249 Squadron at North Weald on 19th September. He claimed a Ju88 destroyed and another shared on the 27th, probable Bf109's on 7th and 25th October, a shared Ju88 and a Do17 damaged on the 28th and another probable Bf109 on the 29th.
Millington was in combat with enemy fighters over the Channel on 30th in Hurricane I V7536 but failed to return.
He was 23 and is commemorated on the Runnymede Memorial, panel 9.
So the Battle of Britain drew to a close and the threat of invasion receded. With the transition to the ‘Blitz’, the RAF found itself woefully unprepared for night fighting. Over the next six months the Bristol Beaufighter equipped with Airborne Interception radar appeared in units.
Meanwhile survivors of the Battle were often posted away and promoted. Some of the Australians were to fall in later phases and places where the skies were contested. Mayers, McGaw, and Moore all lost their lives later in the war.
Pilot Officer Vincent Parker had been downed in the Channel in August and taken PoW. He took part in a number of escape attempts and ended up in Colditz. He resumed duty with the RAF at the end of the war but was killed in an accident flying a Hawker Tempest in 1946.
Some went on to serve in the RAAF and others continued in the RAF. Ronald Lees became an Air Vice Marshal and Deputy Chief of the Air Staff in 1960 eventually retiring to South Australia.
Australians who fought in Fighter Command during the Battle of Britain:
