


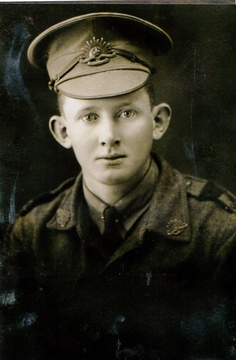
REYNOLDS, Frederick James
| Service Number: | 1851 |
|---|---|
| Enlisted: | 14 April 1916, Goulburn, NSW |
| Last Rank: | Private |
| Last Unit: | 35th Infantry Battalion |
| Born: | Moss Vale, New South Wales, Australia, 1897 |
| Home Town: | Moss Vale, Wingecarribee, New South Wales |
| Schooling: | Moss Vale Public School |
| Occupation: | Labourer |
| Died: | Killed in Action, Belgium, 12 October 1917 |
| Cemetery: |
No known grave - "Known Unto God" |
| Memorials: | Australian War Memorial Roll of Honour, Moss Vale & District Pictorial Honour Roll, Moss Vale Great War Honour Boards, Moss Vale RSL War Memorial, Moss Vale War Memorial, Ypres (Menin Gate) Memorial |
World War 1 Service
| 14 Apr 1916: | Enlisted AIF WW1, Private, 1851, 35th Infantry Battalion, Goulburn, NSW | |
|---|---|---|
| 4 Sep 1916: | Involvement Private, 1851, 35th Infantry Battalion, Third Ypres, --- :embarkation_roll: roll_number: '17' embarkation_place: Sydney embarkation_ship: HMAT Port Sydney embarkation_ship_number: A15 public_note: '' | |
| 4 Sep 1916: | Embarked Private, 1851, 35th Infantry Battalion, HMAT Port Sydney, Sydney | |
| 7 Jun 1917: | Involvement AIF WW1, 35th Infantry Battalion, Battle of Messines | |
| 12 Oct 1917: | Involvement AIF WW1, 35th Infantry Battalion, Broodseinde Ridge, Killed in Action. Listed as missing but eventually confirmed on 30 May 1919 as killed |
Help us honour Frederick James Reynolds's service by contributing information, stories, and images so that they can be preserved for future generations.
Add my storyBiography contributed by Allen Hancock
REYNOLDS, Frederick James (1892-1917)
Frederick James Reynolds was born in 1897 in Moss Vale, New South Wales, the third of 5 children of Albert Douglas Reynolds and Emily Agatha Cowley. Having just turned 18 Fred Reynolds must have been envious as first his brother Bert and then his cousin Robert Cowley left for the war as members of the Australian Light Horse in 1915. He spent 4 years in the Senior Cadets and for 6 months after he turned 18 he trained as a member of the militia’s 28th Light Horse. When he was finally able to enlist on 14 April 1916 at the age of 18 years 10 months it was as a member of the 2nd Reinforcements for the 35th Battalion.
Fred embarked for overseas service from Sydney on 4 September 1915 aboard HMAT PORT SYDNEY, ironically the same ship on which his brother and cousin would return in 1919. He disembarked in Portsmouth on 29 October 1916. Fred left England for France on 20 December and joined his unit in the Armentieres sector near Houplines on 26 January 1917. The battalion spent the remainder of the winter in a routine of being in and out of the frontline trenches until on 7 April the Division was withdrawn for a rest and training. On 7 June the battalion returned to the front.
"Launched on 7 June 1917, the Messine offensive was designed to force the German enemy to withdraw from the main battlefront of Vimy – Arras. The Battle exemplified tactical success through careful planning and overwhelming firepower.
The primary objective was the strategically important Wyschaete-Messines Ridge, the high ground south of Ypres. The Germans used this ridge as a salient into the British lines, building their defence along its 10-mile length. Winning this ground was essential for the Allies to launch a larger campaign planned for east of Ypres. General Sir Herbert Plumer’s Second Army was chosen for the task, with three Corps allotted to secure the objective. Australian involvement came under Lieutenant General Sir Alexander Godley’s II Anzac Corps (25th British, 3rd Australian, and the New Zealand Division) which was to capture the village of Messines and advance to the flat ground beyond. The 4th Australian Division was reinforcement for II Anzac for the attack and was to complete the second phase of consolidation.
Plumer’s reputation was one of caution and thoroughness in every aspect of operational planning and training. Battle plans were drawn from mid-March 1917, using large models so troops could familiarise themselves with the terrain and their objectives.
The 3rd Australian Division, commanded by Major General John Monash, was the last of the Australian Infantry Divisions to join the front line in December 1916. The II Anzac Corps formed part of a 12-division attack; supported by 1,500 field guns and 700 heavy guns; relying on photographs of the enemy’s defensive positions taken by the Royal Flying Corps.
For two years Australian, British, and Canadian miners had engaged in subterranean warfare digging an intricate tunnel system under the enemy’s front line. The Allies used these tunnels to further tactical advantage, packing massive charges of the explosive ammonal to obliterate enemy defences. The main Australian effort was at Hill 60 where Tunnelling Companies worked for months, reinforcing and protecting the large mines in its region. The professionalism and skill of all the Allies was demonstrated by the Germans’ inability to locate mines.
The attack, codenamed ‘Magnum Opus’, was set for 7 June 1917 with ‘Zero’ hour at 3:10am. A seven-day preliminary bombardment was conducted to put pressure on the enemy during the days leading up to the infantry assault. Battalions were brought forward from their billets in Pont de Nieppe to the farms around the south and west of Ploegsteert Wood. Raiding parties regularly captured enemy prisoners to extract vital intelligence on German preparedness for an attack. Battalion working parties prepared for the impending battle, digging assembly or communication trenches, stockpiling shells (gas, shrapnel, High Explosive, and mortar) and assisting in the bringing up of supplies to forward positions.
The Germans were aware of the impending offensive, but it was coincidence that they shelled the Wood with gas while attacking troops were forming. At 11pm on 6 June, the 3rd Division was subjected to a gas attack, causing between 500 and 2000 casualties.
Every German gun seemed to be pouring gas shells over, and the air was full of the whine peculiar to the aerial flight of a gas-shell. They burst all-round the columns, and a number of men were killed or wounded by flying nose-caps. Occasionally the monotonous whine and pop of impact was relieved by a high explosive or an incendiary shell, and the casualties were fairly heavy. The remainder of the approach march was like a nightmare. The actual wearing of a small box-respirator is a physical discomfort at any time, but on a hot dark night for men loaded with ammunition, arms, and equipment, it is a severe strain. Wounded and gassed men were falling out, and officers and non-commissioned officers were continually removing their respirators to give orders and to keep their platoons together. A shell would burst in a platoon, the dead and wounded would fall, and the rest of the platoon would pull themselves together and move on, for above everything was the fixed determination to be in position at the Zero hour, and the realisation that this terrible gassing, if it prevented our arrival on time, might easily result in the failure of the whole operation.
Messines was the first time Australians and New Zealanders had fought side by side since the Gallipoli campaign of 1915. The 3rd Division’s attacking front line stretched from St Yves to La Petite Douve Farm. They were to capture the ground to the east of Messines village all the way to the final Green Line objective. The 10th Brigade was on the left of 3rd Division’s front (alongside the New Zealand Division) and the 9th Brigade on the right, forming the southernmost flank of the great Messines offensive. The 10th Brigade was tasked with fording the La Douve River. Bridges were constructed to reach the enemy’s front line. The New Zealand Division was tasked with the capture of Messines and onwards until the Black Line was reached, whereupon the 4th Division passed through them up to the final objective of the Green Line.
At 3:09am, eyes peered nervously through the darkness at watches as the final seconds ticked down. Along the front line, men waited anxiously for the subterranean cataclysm that signalled battle had commenced. At 3:10am on 7 June 1917, the detonator switches were triggered. The earth erupted into pillars of fire and earth, instantly obliterating the thousands of German troops above them.
The detonation of nineteen mines along the Messines/Wytschaete ridge signalled the start of an attack designed to capture the strategically important high ground to the south of Ypres; a vital precursor to the larger Third Battle of Ypres (known to history as the battle of Passchendaele). Despite General von Kuhl suggesting the withdrawal of the German front line troops away from the ridge as it had become apparent a major British offensive was to be launched, front line commanders argued vehemently against this. Consequently, many thousands of German troops were simply obliterated as the earth erupted beneath them. As the historian of the 37th Battalion wrote, ‘Nothing could have withstood such an onslaught; and nothing did.’
Climbing out of the trenches, waves of attacking British, Australian and New Zealand soldiers of Godley’s II Anzac Corps sought to capitalise on the shock of these explosions and the accompanying artillery barrage and occupy the enemy’s positions before they had the chance to form a new defensive line. The scale of the mine explosions neutralised both the enemy’s guns and disrupted their planned counterattacks. One mine had detonated in front of the British 25th Division’s sector, while three detonated in front of the 3rd Australian Division’s sector with a fourth just to the right of that. A great machine gun barrage fired over the heads of the attacking infantry and pioneers as they moved forward in the pre-dawn darkness, with choking smoke and dust in the air from the great disruption of earth further hampering visibility. German troops directly above each of the mines had been wiped out by the blast along lengths, Bean estimates, ‘of some 150 yards of trench.’
The German survivors in II Anzac’s sector were largely stunned and demoralised due to the great concussion of the blasts, the heavy artillery barrage and the heavy machine gun fire that now poured upon them. Many German prisoners were taken during this phase.
The 3rd Division’s objective was to push all the way through to the Green Line. This was achieved comparatively easily, especially in light of the AIF’s battle experiences on the Western Front, the growing tactical skills of the Australian infantry, and to the overwhelming firepower of the allied assault. Rigorous training on Salisbury Plain and in France had prepared them as well as possible for the ensuing attack – including training in preparations for consolidating craters such as they would encounter at Messines.
One of the only places of resistance along the 3rd Division’s frontage in this early phase of the attack was found on the extreme southern edge, where the 33rd Battalion faced some determined German opposition from beyond the flank of the attacking line. Following some accurate sniping to keep the enemy back, the position was consolidated. It was here however, on 8 June, that 1983 Pte Alan Mather of the 33rd Battalion was killed in action in Ultimo Trench, just north of Factory Farm.
Mather is notable because his remains were uncovered by a British Archaeological Team in 2008 led by Richard Osgood and Martin Brown, excavating trenches used during the Battle of Messines. Mather was eventually identified mainly by DNA comparison and buried with full military honours in July 2010. His uniform, rifle and personal effects were returned to Australia, conserved, and with the co-operation of Pte Mather’s descendants, now feature in the new Australian Army Infantry Museum at Singleton.
From approximately 4:30am, the barrage halted for an hour to allow fresh battalions to move forward in preparation for the second phase of the initial attack. Prior to this, battalions had moved relatively unimpeded through the choking smoke and dust to their objectives, in line with the various lifts of the creeping artillery barrage. The halt gave the Germans a chance to regroup, and after the initial onslaught, they began to provide greater resistance to the attack, slowing down the rate of the infantry’s advance. The New Zealand Division was tasked with the capture of the village of Messines. Their battalions passed through and around the village ruins, subduing enemy activity where they found it. The 25th Division on their left similarly achieved its objectives. The long halt in the middle of the day saw success throughout II Anzac’s sector.
Plumer planned to resume the attack at 1pm, however delays by the central IX Corps (to II Anzac’s left) in moving their troops up meant that the afternoon attack did not go in until 3pm. When the attack was pressed forward again, two brigades of the 4th Australian Division moved through the 25th and New Zealand Divisions to the final objective (Green) line. Their success was only possible because of the successful capture of the ridgeline by the British 25th, the New Zealand and 3rd Australian Divisions. The New Zealand Division had captured and held the village of Messines with comparatively little difficulty, while pillboxes were able to be isolated and destroyed.
In the afternoon, the 12th Brigade of the 4th Australian Division pushed up to the Oosttaverne Line, capturing and holding sections of it as the remainder of the attackers made their way to that objective. It was here that German resistance hardened significantly. The capture of the remainder of the Oosttaverne Line in II Anzac’s sector took another four days and nights of hard fighting.
By the evening of the 7 June, Plumer’s bite and hold attack to take the Messines ridgeline was a tactical and strategic success. In the II Anzac Corps sector, the 3rd Division had been ‘blooded’ in its first major battle of the war, the New Zealanders had confirmed their standing as one of the BEF’s best formations, while the 25th Division too fought very well to achieve its objectives. Supporting, the 4th Division had consolidated the ground already won and pushed on to hold the final objective. Along the entire attacking front, the three Corps offensive had been a success and the salient south of Ypres had been eliminated. Two Australian Victoria Crosses were awarded from the battle at Messines – to Robert Grieve and John Carroll. Such a spectacular victory came at a price, with some 26,000 casualties sustained, while II Anzac suffered 13,500 of that total figure. The Germans sustained an equivalent number of casualties. The Battle of Messines was the most complete success of any major Western Front attack by the Allies to that stage of the war.” [http://www.army.gov.au/Our-history/History-in-Focus/The-Battle-of-Messines-1917 ]
The 3rd Division remained in the Messines sector until the end of July working to consolidate the ground gained. According to the 35th Battalion’s War Diary for July 1917:
“The month was one of the most strenuous in the history of the Battalion (not including the big offensive in June) as the new ground in front of Messines was in a very wet and muddy state, and hastily constructed trenches combined with long tours in the line, and the natural desire of the enemy to prevent us settling down made conditions very trying for all ranks.”
On 30 September, the Battalion returned to the front line near Zonnebeke where their first tour in the trenches proved expensive with 18 men killed.
At 3:30 am on 11 October the 35th Battalion left their camp at Cavalry Farm on approach to the tape line for their next major offensive. The track taken was difficult to manage due to very muddy conditions and being constantly shelled. At zero hour (5:25 am) the 35th Battalion followed the 34th Battalion as they captured their initial objective. The 35th then passed through the 34th as they moved to capture the second objective.
After mid-1917, and following mutinies in the over-strained French Army, the British Forces had to assume an even greater role in the war on the Western Front. For Field Marshal Sir Douglas Haig, the British commander-in-chief, this provided an opportunity to launch an offensive that he had long wanted. Attacking from Ypres in Belgium, he planned to drive the Germans from the surrounding dominant ridges and even hoped to reach the Belgian coast. Following on the success at Messines, he unleashed his great attack on 31 July 1917. Fighting went on, often in appalling weather and despite crippling losses, until November. Finally, with the army stuck in muddy fields churned up by the artillery fire, the bloody offensive came to an untidy close. Many would afterwards call this offensive, actually a series of battles, after the name of the village that had become the last objective – 'Passchendaele'.
The 1st, 2nd and 3rd Australian Divisions captured Broodseinde Ridge on 4 October 1917. It was a vital victory. But then it began to rain. Five days later the 2nd Australian Division suffered heavily in a further attack in the mud. Finally, on 12 October, another attack, involving the 3rd Division assisted by the 4th, was made against the village of Passchendaele atop the main ridge. In the face of heavy fire, the men fought in the mire while struggling to keep up with their artillery barrages. Ground was taken but it could not be held.
After being held up temporarily by machine-gun fire the 35th Battalion won their objective at about 10:00 am having suffered heavy casualties. They commenced consolidating their position and continued until 3:00 pm when they were forced back to a position about 200 yards from their original start line. In all the battalion had lost 53 men confirmed as killed plus another 56 missing. One of those missing was Frederick Reynolds.
With no bodies found the missing were the subject of a formal investigation to confirm whether they could be presumed killed. Such investigations usually consisted of interviews with other soldiers. According to Private Joseph Pebblewick, he and Fred were members of C Company. They both hopped over together at about 5:00 am, Pebblewick being No 1 and Reynolds being No 2 on the same Lewis Gun. They kept together for about half an hour and then found themselves in a marsh. They were struggling to get through the marsh, Pebblewick being in front of Reynolds and after an interval of about 10 minutes, he turned around to look for Reynolds and saw that he had disappeared. He was never seen again and was reported missing. Many shells were falling all around them and it was Peblewick’s opinion that Reynolds must have been killed by a shell. Pebblewick described Fred as “a very well-liked chap”. [Australian Red Cross Society Wounded and Missing Enquiry Bureau files, 1914-18 War 1DRU0428, https://www.awm.gov.au/people/rolls/R1499100/]
On 30 May 1919 20-year-old Frederick James Reynolds was confirmed as having been killed on 12 October 1917. With no known grave Fred is commemorated at the Menin Gate Memorial to the missing.

Click images to start slideshow.