


About This Unit

The 6th Light Trench Mortary Battery
The 6th Light Trench Mortary Battery belonged to the 6th Brigade of the 2nd Division, which was drawn larely from Victoria. It was raised in Egypt after the ANZAC Division returned from Gallipoli, and the 'doubling of the AIF' took place.
Light Trench Mortar Batteries went where their parent Brigade went and their involvement in battles / campaigns reflects that of the Brigade.
Trench Mortar Batteries and Machine Gun Companies gave the Brigades their own integral fire support. The trench mortars were the Brigade's own ‘artillery’ and the soldiers were generally drawn from units within the Brigade. The Battery would have, as in the accompanying photo, provided support exclusively to the Battalions of the Brigade.
Mortars are simple but terrifyingly effective weapons; almost as old as gunpowder itself. They are relatively short barrelled, and in WW1 were generally smooth bore weapons that fire projectiles at a high angle at relatively modest velocities. This makes for relatively low pressures and therefore simple manufacture. The bombs were initially cylindrical and later, fin stabilised, with a point detonating fuse.
At the start of the First World War, the Trench Mortar did not exist in the British Army. The Germans had them, where they were known as Minenwerfers, but certainly not in great numbers.
The mortar’s characteristic high angle trajectory suited it to trench warfare. Its capacity to lob bombs right into trenches soon ensured that demand for them grew. The suffered one major drawback; their relatively short range meant they were necessarily located close to the front lines, which did not enamour them to the infantry (because they attracted enemy artillery fire) and made them vulnerable to direct infantry assault.
Mortars fire high-explosive fragmentation bombs at a high angle, which detonate on impact or in some cases, with a very slight delay. In military parlance the mortar provides 'Indirect' Fire. In this context that means the weapon is not aimed along a line of sight directly at the target like a rifle or machine gun. A ‘zero line’ or datum is established by use of aiming posts that are aligned via a compass. The sight is zeroed on the aiming post and bearings applied by winding on the sight.
In the case of the mortar the projectile follows a high looping path to the target not unlike a tennis ball lobbed over the net to the opponent. Its point of impact is determined by the power of the propelling charge, the elevation of the barrel or tube, and the direction (or bearing) it is pointing.
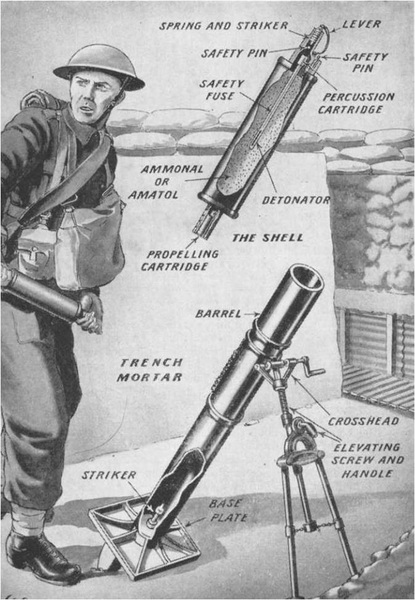
The light trench mortar was the Stokes 3 inch mortar. It was effectively not much more than a simple tube for a barrel, with a bipod to support it and a steel base plate on which to mount the tube and bear its recoil. It fired a cylindrical bomb to about 800 yards, although its range improved throughout the war. Later the bombs were fin stabilised. They were relatively mobile and could be dismantled and packed up in minutes.
The Stokes Mortar was served by a three man crew. Mortars tend to be ‘pretty basic’ – the Stokes Mortar particularly so, although they evolved quickly.
It comprised a barrel, which was a smooth bore steel tube with a screw-in firing pin fitted in its base.
An adjustable bipod held the tube at the required elevation and azimuth (bearing) and was fitted with rudimentary sights.
A base plate absorbed the recoil and reduced the rate at which the weapon embedded itself into the earth on which it was positioned, from the recoil of each round fired.
Cylindrical bombs fitted with ‘always’ fuses were launched from the mortar by a simple percussion firing system.
Crew
The Stokes Mortar generally had a crew of three.
The ‘Number One’ in the crew would lay or aim the mortar - although they were not in direct line of sight to the enemy.
He would use an aiming post and set a bearing to the target on the mortar’s dial sight using the aiming post as the datum or ‘zero line’.
An elevation would be set using a clinometer and range tables. The mortar fired a characteristically high angle trajectory and maximum range was achieved at about 45 degrees.
The ‘Number Two’ loaded and fired the mortar.
He would load a bomb into the muzzle of the mortar by hand. As he released it, the bomb would slide down the barrel until it hit a firing pin in the mortar’s base.
This would initiate a primer in the base of the bomb, igniting the cordite propellant charge, the blast from which would then project the bomb out of the barrel.
The flash and blast of the mortar could give its position away so they were generally fired from cover - such as from the base of a trench - the deeper the better!
The ‘Number Three’s’ task was to keep a supply of bombs up to the mortar.
This involved collecting ammunition from carrying parties and stowing it nearby, then unpacking the ‘ready’ bombs from their transportation packaging.
On receipt of an order to fire, the Number Three would adjust the charges if necessary to match the range and elevation necessary to engage the target by removing charge bags of propellant from the bomb.
When the fire mission commenced, he would remove the safety pin from the fuze before passing the bomb to the Number Two.
At high rates of fire it was possible to get 15-20 bombs in the air before the first one hit the ground; this was perhaps the mortar’s most valued attribute - a high volume of fire in a short space of time. The high angle trajectory meant that bombs descended steeply and could lob directly into a trench or dugout and then detonate to deadly effect. Hundreds of jagged steel splinters would be created by each bursting bomb.
Trench Mortar Batteries would have been high on the list of priority targets for enemy counter battery fire - fired by heavy artillery. This meant they may not be the most welcome of companions in the front line! Many of the casualties sustained by mortar battery personnel would have been thus inflicted. The other vulnerability lay with their being relatively close to the Front Line and thus were potentially victims of enemy infantry raiding parties.
Battle / Campaign / Involvement
Gallipoli (/explore/campaigns/1) – post 12 Sep 1915
Pozieres (/explore/campaigns/5)
Mouquet Farm (/explore/campaigns/103)
Flers/Guedecourt (/explore/campaigns/24)
Outpost Villages (/explore/campaigns/21)
Second Bullecourt (/explore/campaigns/6)
Third Ypres (/explore/campaigns/18)
Menin Road (/explore/campaigns/26)
Broodseinde Ridge (/explore/campaigns/18)
Poelcapelle (/explore/campaigns/27)
German Spring Offensive (/explore/campaigns/80)
Peaceful Penetration (/explore/campaigns/31)
Le Hamel (/explore/campaigns/33)
Battle of Amiens (/explore/campaigns/14)
Last Hundred Days (/explore/campaigns/11)
Mont St Quentin (/explore/campaigns/15)
Breaching the Hindenburg Line (/explore/campaigns/81)
Montbrehain (/explore/campaigns/128)
Steve Larkins October 2013
We would particularly like to encourage individual historians researchers or members of unit associations to contribute to the development of a more detailed history and photographs pertaining to this unit and its members.
Please contact [email protected] (mailto:[email protected]) for details on how to contribute.

Click images to start slideshow.